In this blog post, we will go through the initial preparation and deployment of VCF 9.1 in a nested environment.
Lab details and prerequisites:
We have 4 nested ESX hosts, each equipped with 24 vCPUs, 128 GB of RAM, and 4 disks, one 64 GB disk for ESX installation and 3 x 200 GB disks for the vSAN ESA storage pool.
We are using Quagga router for our nested lab, and since Quagga router doesn’t support VLANs, we are going to use the default VLAN 0 with different subnets for MGMT, vMotion, vSAN, and NSX Overlay, as stated below.
|
Network type |
Subnet |
VLAN ID |
|
Management |
172.20.10.0/24 |
0 |
|
vMotion |
172.20.20.0/24 |
0 |
|
vSAN |
172.20.30.0/24 |
0 |
|
NSX Overlay |
172.20.40.0/24 |
0 |
We will also need 17 DNS records for all the components that are going to be deployed initially. The list below doesn’t include the DNS records for the components that are going to be deployed as a Day 2 task.
|
FQDN |
IP |
|
172.20.10.20 |
|
|
172.20.10.21 |
|
|
172.20.10.22 |
|
|
172.20.10.23 |
|
|
172.20.10.27 |
|
|
172.20.10.28 |
|
|
172.20.10.29 |
|
|
172.20.10.30 |
|
|
172.20.10.31 |
|
|
172.20.10.32 |
|
|
172.20.10.33 |
|
|
172.20.10.34 |
|
|
172.20.10.35 |
|
|
172.20.10.36 |
|
|
172.20.10.37 |
|
|
172.20.10.38 |
|
|
172.20.10.39 |
Two IP ranges are required:
-
One for the VCF Management services with a minimum of 12 IP addresses.
- One for VCF Automation with a minimum of 5 IP addresses, as stated below.
|
Component |
IP Range |
|
VCF Management services |
172.20.10.80 – 172.20.10.93 |
|
VCF Automation |
172.20.10.95 - 172.20.10.101 |
ESX Configuration:
Let’s first start with the ESX config. We are not going to go through the initial installation of ESX on the nested VMs, as it’s a very straightforward task. All you need to do is upload the ESX 9.1 ISO image to one of the datastores of the physical hosts, or the vCenter, and then attach the datastore ISO image to the nested host VM and boot from it.
The installation process is the same as the earlier versions nothing is new.
Once ESX has been installed on the hosts, we then configure the NTP and TCP/IP stack.
At first glance, you’ll see that the ESX UI has changed in 9.1, and it now looks a bit similar to the vCenter UI.

The first thing we need to do is configure NTP. You’ll need to go to Configure, Time Configuration, Edit, and add your NTP server or servers, then click the Enable checkbox.
Something to note: in previous versions, you were able to modify the service startup policy from the same screen and make it start and stop with the host, but in 9.1 it’s a bit different, You just configure the NTP servers from the screen below, and then, when you enable the service, you’ll have the option to edit the startup policy.

To edit the startup policy and enable SSH, you’ll need to go to Services and start both services.

And you should be able to edit the startup policy for the NTP daemon from the Services tab to start and stop with the host .

Once this is done, you’ll need to configure the ESX host’s default TCP/IP stack. You’ll need to go to Configure, then choose TCP/IP Configuration, click on the three dots of the default TCP/IP Stack, and select Edit.
Add the hostname, domain, DNS server, and search domains, and click OK.
If you are using VLANs in your environment, which most probably will be the case, you’ll need to go to Networking, then Portgroups, and add the VLAN ID of the VM Management network to the default VM Management portgroup. In my case, as mentioned before since we are using Quagga router for our nested lab, which doesn’t support VLANs, we will just keep it at the default, which is VLAN 0.
Once you finish the above configuration and the ESX hostnames are changed, you’ll then need to regenerate the self-signed certificate by executing the following commands:
1- SSH to the ESX hosts
2- Run # /sbin/generate-certificates
3- Then reboot the host

And with that, i would say that the host preparation is complete, and now we will proceed with the VCF installer config. We will not go through the VCF installer VM deployment, we will jump directly to the configuration.
In my case, i deployed the VCF installer VM on a separate nested host that will not be used during the deployment. however, you can also deploy it on one of the management domain hosts that are going to be used during the bring-up.
Once the VCF installer is powered on, we then proceed with the configuration.
We first need to configure the depot. In our case, we have a direct connection from the VCF installer to the internet thus we will use the online depot. You’ll need to go to Depot Settings and Binary Management.

Then configure the Online Depot

You’ll then need to copy this download service ID and add it to the vcf.broadcom portal to generate an activation code.
Note:
For each VCF installer you deploy, you’ll need a different activation code, as each VCF installer has a different download service ID.
Once you generate the activation code, you’ll just paste it and click Authenticate, and that’s it.

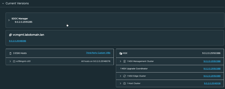
Once we have the online depot configured successfully, we will then need to download all the binaries.

Select all and click download.

You should see all the binaries downloaded after a while, for me the download process took 15 minutes.

Now we are all set to start the deployment; mmm... not really, since we are deploying VCF 9.1 in a nested lab, there are a couple of workarounds that we need to apply first on the VCF installer for the precheck and deployment to succeed.
You’ll need to SSH to the VCF installer appliance, log in as VCF, then use SU to switch to root. Once there, you’ll need to add some entries to the application.properties file, as highlighted in the screenshot below.
Note:
You might need to add more entries depending on your deployment.

And also an entry will need to be added to the feature.properties file.

After modifying both files, you’ll then need to restart the VCF installer services, using the below command:# echo 'y' | /opt/vmware/vcf/operationsmanager/scripts/cli/sddcmanager_restart_services
All of the above workarounds are very well documented in William Lam’s post below:
VCF 9.1 - Comprehensive VCF Installer & SDDC Manager Configuration Workarounds for Lab Deployments
VCF Deployment:
And now we are ready to proceed with the deployment. We click on the Deployment Wizard, then Cloud Foundation. The VCF installer can also be used to deploy VVF, not only VCF.


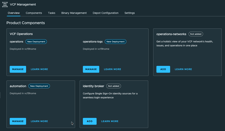
Here we are going to deploy a new VCF fleet. however, you can also add a new VCF instance under the same fleet or deploy deferred components that you may have skipped during the bring-up of the new VCF fleet, like Automation and Operations.
This is a new functionality in 9.1. In the previous 9.0.x versions, if you skipped Operations deployment, you needed to deploy it through the SDDC Manager API, but this is no longer the case. Now you can deploy it from the installer using the Deploy Deferred Components option. Only Automation and Operations can be skipped during the new VCF fleet deployment.
In our case, we will deploy a new VCF fleet with all the components.

On this page, you can choose if you want to use existing components, like an existing vCenter that you want to convert, or existing Operations or Automation clusters.
In our case, we don’t have any, thus we will keep all deselected and click Next.

For the deployment model, we are going to use Simple. When you choose Simple, the default deployment size will be Small and it can’t be changed to a larger size. Actually, not all the components will be Small, if you look down, you’ll find that all the components are deployed as Small except the NSX Manager, which will be deployed as Medium.


For the Network options, we will choose customize

In our case, we want to use the same network for both the Management VMs and the ESX Management VMkernel.

If you enable the radio button, this option will defer/skip the deployment of Operations and Automation. You can use this option if you want to deploy Operations and Automation on a different port group other than the VM Management or an NSX segment later on as a Day 2 task, using the Deploy Deferred Components option discussed earlier at the beginning of the VCF installer.
In our case, we will keep it deselected, as we want to deploy the full stack.

Here we’ll choose the transit gateway type. Keep in mind that the default option is Distributed connectivity, and if you choose this option, later on in the deployment wizard it will ask you to provide a network/subnet that will be used for the Distributed connectivity model.
If you choose Centralized connectivity, it won’t ask you for any further details, and it can be configured as a Day 2 task after the deployment completes from vSphere/NSX.
In our case, we will choose Centralized connectivity and click Next.

For the storage type, we are going to use vSAN ESA to test the new amazing features provided in VCF 9.1. As you can see you have the option to enable vSAN data-in-transit encryption, which doesn’t require a key management server. In our case i’ll enable it.

Now we review the prerequisites for the deployment model we chose which is Simple.

Resource Requirements Details:

VLAN Requirements Details:

FQDNs and IP Addresses Requirements Details:

A very nice option that has been added to the VCF 9.1 installer is the ability to generate the FQDNs for your deployment. You can click on “PRE-FILL GENERATED FQDNS IN WIZARD”.
A new wizard will open, which will ask you to add a prefix, suffix, and domain name, and based on your input it will generate a list of FQDNs for you based on the pattern you provided. You can create your DNS records on the spot and validate whether they have been created successfully or not by using the Validate option, and you can customize them if you want, in my case i’ve already created the DNS records ahead of time, so i’ll just cancel, i just wanted to show you this new feature, which can be used during the planning phase of the deployment.

Now that we have finished the planning phase, we will proceed directly with the preparation phase. You’ll need to add your VCF instance name, management domain name, and whether to opt in or out of the CEIP.

The DNS and NTP server details will be automatically populated with the DNS and NTP you configured the VCF installer with. In my case, I will not change anything here, as the same DNS and NTP will be used for my VCF instance.

Next we will add our ESX hosts. For this deployment, we will use 4 nested hosts for the Management Domain. Once we add all the hosts of the management domain, we will then click on Confirm All Fingerprints.

Once all the fingerprints were validated, it gave me this warning that my resources don’t meet the recommended 20% extra resource availability. I’ll just ignore this warning, but for a production deployment you should always follow the recommendations.


Now we will configure the networks, MTU, and VLAN ID for Management, vMotion, vSAN, and NSX Overlay, as well as the IP ranges for the VCF Management services and VCF Automation.
VCF Management services require minimum 12 consecutive IP addresses.
VCF Automation requires at least 5 consecutive IP addresses.


And now we will enter the VCF Management FQDNs. We will need a total of 9 FQDNs for the VCF Management as shown below:


For the vCenter, you’ll just need to type the vCenter FQDN. All the others are pre-populated for you based on the management domain name you configured at the beginning. My management domain name was sa-mgmt, thus it generated the DC and cluster names shown below.

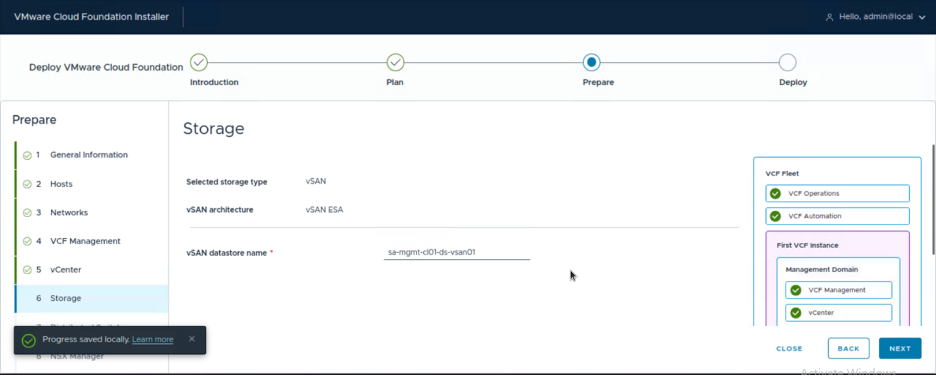
For the storage, it will only prompt you to add the datastore name, since the storage config was done earlier in the planning part.
The Datastore name was also pre-populated based on my management domain name.
Now, for the vDS part, you have multiple options:
- Default (requires 2 or more NICs)
- Storage traffic separation (requires 4 or more NICs)
- NSX traffic separation (requires 4 or more NICs)
- Storage Traffic and NSX Separation (Requires 6 or more NICs)
- Custom switch configuration (requires 2 or more NICs)
In my case, i’ll choose the default.

We will leave the MTU as 9000 and keep the pre-populated vDS name

You also have full control to modify the port group names, active/standby uplinks, and load balancing as required.


If you leave the checkbox selected, the NSX vDS will be prepared as Enhanced Data Path Standard, which is the new default option for NSX since VCF 9.0.x. You can refer to the documentation below for the EDP requirements:
Enhanced Data Path Documentation
In my case, i’ll leave it as default to use EDP.

Now we need to type the FQDNs for the NSX Manager appliance and the cluster FQDN (VIP FQDN).

And lastly, the SDDC Manager FQDN.

You review the deployment details and download the JSON spec for your reference as you might need it later on.

Now we wait for the precheck to complete, and once it completes successfully, we review and acknowledge any warnings that might appear and we click on Deploy.

You can monitor the deployment from the VCF installer.

And i don’t know if you noticed or not, but in the VCF 9.1 installer you don’t have an option to type your own passwords but rather the installer will generate the passwords for all the components, and you can export the list as either JSON or CSV.

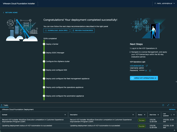
And after a while, the deployment is successful, and you have a full VCF 9.1 private cloud that you can use.

In the next blog posts, we will cover how to deploy a VI workload domain, NSX Edge cluster, Supervisor, and license your VCF 9.1 deployment in disconnected mode.
Stay tuned for more content and see you next time.

.jpg?width=225&height=132&name=20260513_224140%20(Large).jpg)