Preamble
Update on the hardware
Before discussing the actual deployment, I would like to add some updates to my homelab setup. As I've mentioned in the previous article, the Ubiquiti SFP+ are not compatible with the Intel X710 chipset in the MS-A2. I ordered new ones and spent some extra time reading the descriptions and compatibility guides. I decided to buy these: 10Gtek for Intel 10G SFP+ to RJ45 Module. Changing the SFP+ the 10G connection came online immediately and everything runs smooth. Fun fact: these SFP+ are cheaper than the Ubiquiti ones.
Changes in the configuration - lessons learned
During the deployment I got stuck in an endless loop when the installer tried to move the vmnics to the DVS. Took me a while to figure out what's going on. I have a split setup, 1x2.5G and 2x10G having a dedicated ESX mgmt vmkernel port on the 2.5G interface. Unfortunately the initial vm network is placed on the same vswitch. Once the vmnic is moved, the installer looses the network, obviously. So always have redundant network links on the vswitch to start. I added the second 10G interface to the vswitch and voila, the deployment continued. During the deployment I change to my designed setup: 1 DVS for the ESX management vmk with 2.5G and 1 DVS with 2x10G for all other network traffic types.
A second change was adding the VLAN ID to the ESX mgmt vmkernel port. My plan was to connect the interface to an access port on the physical switch. The installer can't handle two different VLAN IDs for the management networks (host and vm). So I changed the physical switch ports for management to trunk and added the VLAN ID via the DCUI.
A third recommendation is, please use a 512GB NVMe as installation disk for the ESX if you plan to deploy the installer appliance to one of the lab hosts. I have only 250GB ones. The reason is simple: after the ESX installation you end up with a 104GB local VMFS datastore. That is very tight for the installer appliance. If you download all files from the offline depot to the appliance at once, the storage capacity is not sufficient for the validation. It seems the installer extracts some files to validate and that process consumes extra capacity. If you download and validate only two files at a time, you can squeeze it in with a remaining capacity of 9.6GB in the datastore. I recommend spend the few extra bucks and get a bigger NVMe. I didn't think that through in first place.
Prerequisites
I already created all needed DNS entries on the DNS server running on my firewall and double-checked if the NTP server setup in my firewall works. We are all aware that a successful deployment heavily relies on working DNS and NTP configuration.
My offline depot
For the web server for the offline depot, I decided to use my QNAP NAS instead of building a dedicated virtual machine. I decided to go for HTTP only instead of HTTPS. Just enable the web server, extract the vcf-9.0.1.0-offline-depot-metadata.zip file downloaded from the Broadcom download area and upload the "PROD" folder to the Web folder via the file station. That creates the needed base file structure. Of course you need to create the folders inside the COMP folder for the different products in the deployment.
Needed folders for a complete deployemt:
- NSX_T_MANAGER
- SDDC_MANAGER_VCF
- VCENTER
- VCF_OPS_CLOUD_PROXY
- VRA
- VROPS
- VRSLCM
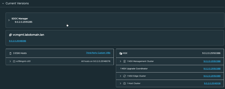
In the end it looks like this

Upload the files to the different folders and you are good to go. To validate if the web server works, I added an index.html file to the Web root folder with a simple content:
<HTML><TITLE>Web directory root</TITLE>Main Web Folder Root</HTML>
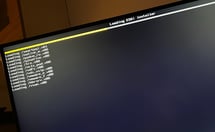
Once the web server is setup and working, I deployed the VCF installer VM to one of my ESX hosts.
Changes to the VCF installer before starting the deployment
As we're deploying a homelab the installer struggles with a few challenges which will not exist in the real world. I know that there are many blog articles out there describing the needed changes, but I didn't find one having all informations in one place. That's the reason I document the changes I made in this article to have everything in a single location.
To make the installer work, ssh into the VCF installer and add the following content to the documented files. Once done, reboot the VCF installer before continuing.
Enable HTTP instead of HTTPS. The LCM depot properties start at line 69. At the end of the block add "lcm.depot.adapter.httpsEnabled=false"
chmod 777 /opt/vmware/vcf/lcm/lcm-app/conf/application-prod.properties
vi /opt/vmware/vcf/lcm/lcm-app/conf/application-prod.properties
:86 hit Enter - jump to line 86
o - (lower case O) insert line afterwards and change to insert mode
copy and paste lcm.depot.adapter.httpsEnabled=false into the new line
:wq - save and quit
chmod 400 /opt/vmware/vcf/lcm/lcm-app/conf/application-prod.properties
Once this change is done, we need to update another file to allow bypassing the vSAN HCL check and allow physical NICs with less then 10G link speed. Execute the two commands
echo "vsan.esa.sddc.managed.disk.claim=true" >> /etc/vmware/vcf/domainmanager/application-prod.properties
echo "enable.speed.of.physical.nics.validation=false" >> /etc/vmware/vcf/domainmanager/application-prod.properties
Please be aware, both commands need to be pasted into a single line.
Reboot the VCF installer. Once done, login with the configured password. There are enough articles out there describing the whole installer wizard walk-through, but honestly, it's not complicated.
Additional host validation - and the certificate
This part is a "better be safe than sorry" paragraph. As we are all aware, the VCF installer requires the ESX hosts to have certificates matching their hostname (fqdn). I figured out, that the configuration you add via the DCUI might not be applied properly. Why, I don't know. There is a simple way to validate and update if needed. Before starting with the VCF installer, ssh into every host and validate via esxcli.
esxcli system hostname get
The output needs to display the domain name, FQDN, and the host name. If one of the values is not correct, use the set option and configure the value properly. Documentation says that restarting the hostd is sufficient, I have to say "no". Once changed, reboot the host.
esxcli system hostname set --host=<your host name>
esxcli system hostname set --fqdn=<your fqdn>
esxcli system hostname set --domain=<your domain name>
Once everything is properly configured, create new certificates.
/sbin/generate-certificates
/etc/init.d/hostd restart
After the host reboot navigate to the host client and manually validate the certificate using your browser. It is important that the fqdn of the host is configured as cname in the cert.
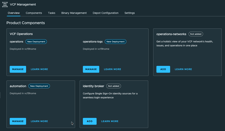
Getting started with the VCF installer
Configure the offline depot in the VCF installer. For the connection to the web server use username any and password any. I didn't add any authentication, but the installer requires this information.
Once the configuration is done, the VCF installer collects the information from the web server and you're able to download the sources to the installer appliance. Select the version from the drop-down menu, select all products, and click the Download link. If your local datastore (if you deploy the installer to one of the lab hosts) has less than a total of 150GB, download and validate only two files at a time, as mentioned in the first section.

Once all files are downloaded, you can start the deployment with the wizard or by uploading a JSON file. 
Click Back in the top left corner and start the wizard. I won't guide you through the wizard with screenshots, because the VCF installer is very simple. Just fill the needed information into the different form pages, be patient while the pre-check validation runs, and you are good to go. With my homelab I received two warnings: vSAN HCL and disks. Both warnings can be acknowledged to continue.
The deployment took something between three and four hours.
The SSO domain name of the vCenter
There is one parameter I would like to explicitly mention: the SSO domain name of the vCenter. The VCF installer provides the default value "vsphere.local" which we all know. Because of contradictions with container services and other services, I highly recommend to choose a different TLD. I went with "vsphere.lan" to avoid interfering with any other service.
One hick-up in the deployment
During the deployment I received the message "vcf install deployment encountered some errors" in the UI. I started digging in the logfile /var/log/vmware/vcf/domainmanager/domainmanager.log and found the message "Failed to install VMCA Certificate on SDDC Manager 127.0.0.1". I wasn't quite happy because I triple-checked my DNS setup upfront.
The reason behind the error is, that the SDDC manager has an entry in it's /etc/hosts file saying that his IP address is 127.0.0.1. It relates to a recent DNS Java library upgrade in the SDDC manager. The fix is simple, just comment the line with that entry.

Famous last words
This article got a bit lengthier then I planned, but I hope it was worth reading and you find all needed information in one place to run a successful VCF9 deployment in your homelab. I am really happy with my new lab, the performance is outstanding, and the setup ran very smooth. Initially I thought I would have to cross more bumps on my way.
This is how I enjoy a private cloud deployment with VCF9.